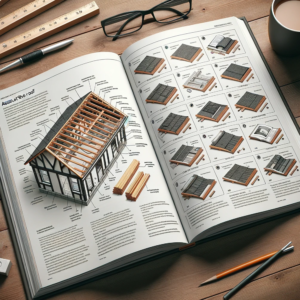
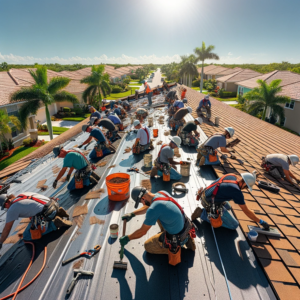
A detailed visual guide for roof installation and replacement presented by Storm Proof Roofing Systems, featuring best practices, step-by-step procedures, and safety protocols to ensure top-quality roofing services.
Considering a roof replacement can be driven by the need to resolve issues or to boost your home’s visual appeal. Understanding the essential steps in the roof installation process is critical to avoid expensive problems like roof leaks and structural damage.
The state of your roof is integral to the safety of your home. Homeowners should decide whether to tackle the project DIY or seek a professional. Our guide provides insights on recognizing when a replacement is due, preparing for the project, and selecting a roofing contractor.
Age: The age of your roof is a critical factor. An asphalt shingle roof may last about 20 years, whereas metal roofs can protect your home for 50 to 80 years with proper maintenance. If your roof is nearing its life expectancy, it’s prudent to consider a new installation.
Shingle Damage: Good condition shingles lie flat. If they are cracked, curled, or buckling, it might be time for a roof replacement.
Internal Water Damage: Sometimes, the need for a new roof isn’t visible from the outside. Check your attic for signs of moisture, such as stains or peeling paint. If you notice these issues, it’s time to think about a new roof installation. For any uncertainty about water damage, it’s always best to consult with a local roofing professional.
Learn how to tackle moss and mold on your roof! These growths can cause damage by trapping moisture. Click here to understand the removal process and know when to act.
Addressing Moss, Mold, and Roof Sagging: Indications for Roof Replacement
Dealing with unsightly moss, mold, or fungi on your roof? These growths tend to thrive in the less sunlit portions of your roofing and can trap moisture, leading to damage even before you spot leaks in the attic. The presence of this green intruder on your shingles might be a precursor to more severe issues. Learn more about moss and mold removal and the signs that indicate it’s time for action.
Get insights on the causes of roof sagging and the necessary steps for a roof replacement to ensure your home’s safety.
Roof Sagging: A Red Flag
Is your roofline starting to droop? Underlying wood rot causing a sag is a critical signal that your roof’s integrity is compromised. This structural concern heralds the necessity for a roof overhaul to prevent potential collapse. Don’t wait for further deterioration—understand why your roof sags and the steps to take for replacement.
Learn how factors such as choice of roofing materials, roof design complexity, and labor costs influence the overall expense. Utilize our roofing cost calculator to receive a customized estimate tailored to your project’s specific needs.
Roof Replacement Costs in Central Florida
The investment for a home roof replacement varies widely, from $5,400 to $19,800, influenced by your selection of roofing materials, the complexity of your roof’s design, and prevailing labor charges. To navigate this, utilize our roofing cost calculator to get a tailored estimate for your specific project needs in Central Florida.
Your roof is a significant investment, not just in terms of money, but also in ensuring safety and quality.
DIY vs. Professional Roofing: Making the Choice
Taking on a roofing project is a monumental task, laden with expenses and demands expertise. A flawed installation can be a safety risk. Moreover, the process itself is exhaustive, involving repetitive ascents and descents with heavy materials. Paying close attention to details, such as the accurate placement and securing of shingles, is imperative to forestall future leaks and breakages.
While DIY may seem cost-effective, having a professional roofing contractor ensures a meticulous installation, enhancing your roof’s durability. Discover the advantages of professional roof installation services and the peace of mind it offers.
Whether you opt for a self-installation or engage a contractor, being informed of the installation steps is beneficial to monitor the project’s progress effectively.
Get ready for your roof replacement project.
Navigating the Roof Installation Journey: A Step-by-Step Guide
Venturing into a significant home upgrade like roof replacement is a substantial endeavor. To prepare for this, it’s beneficial to familiarize yourself with the comprehensive roofing process your contractor will undertake. Here’s an outline of the professional steps for new roof installation.
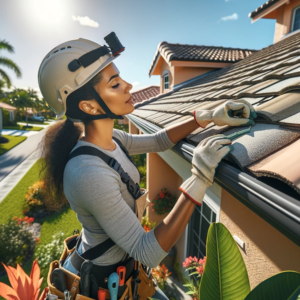
1. Prioritizing Safety
Safety is paramount when it comes to high or steep roof work, which is why such tasks are best left to expert roofers. Here’s how professionals maintain safety:
High-Risk Caution: Professionals know the value of their expertise in preventing falls and injuries.
Fall Protection Gear: Contractors come equipped with fall protection kits, which are also available for around $100 from home improvement centers.
Footwear: Roofers wear shoes with soft rubber soles for better traction, crucial for wet or slippery surfaces.
Clean Working Area: Maintaining a debris-free roof is standard practice to minimize the risk of accidents.
By understanding these crucial steps, you can ensure a smooth roof installation and protect your investment. Whether you’re hands-on or prefer to oversee, being informed helps in keeping the project on track and ensuring quality outcomes.
2. Installation Prep: Setting the Stage
Before the job commences, certain preparations can safeguard your property and smooth the process:
Clear the Area: Trim landscaping and relocate outdoor furniture and vehicles to create a clutter-free workspace. Place garbage bins near the house for efficient debris collection.
Driveway Documentation: Photograph your driveway pre-project for reference and to track the condition post-installation.
Landscaping and Exterior Lighting: Secure your greenery with tarps and shield lighting fixtures to prevent accidental damage. Explore more on protecting your property during roofing projects.
Access and Airflow: Confirm garage accessibility, power source locations, and verify proper ventilation systems to ensure continuous airflow during the project.
Not sure what roofing materials you need to complete the job? Call 352-268-1990 and speak with a roofers now!
3. Material Selection for Your New Roof
The choice of materials is a pivotal step before initiating a roof replacement. You’ll engage in a dialogue with your contractor to select the appropriate roofing materials, considering factors such as your home’s architecture, local climate conditions, budget, and desired aesthetics. Peruse our detailed roofing material guide to find the perfect match for your home.
For the project, your contractor will procure a comprehensive inventory of materials, including:
Underlayment: Either #15 or #30 Felt, acting as an additional barrier against the elements.
Roofing Material: Choices range from asphalt, metal, or other alternatives, depending on your preference.
Additional Components: Including drip edge, hook blades, nails, sealant, waterproof underlayment, staples, and various types of flashing (step, dormer, valley, and vent).
Equally essential are the tools required for the job, which your contractor will handle:
Essential Tools: An array of specialized equipment such as air compressors, hoses, caulk guns, and more, detailed on our roofing tools page.
Not sure what roofing materials you need to complete the job? Call 352-268-1990 and speak with a roofers now!
4. Removing Old Roofing
The process of removing your old roof is critical for a successful installation. If your home currently has asphalt shingles, a shingle fork will be employed to strip them from the roof, systematically working from the peak downward, with waste being properly disposed of in nearby receptacles.
Considering a different approach? Learn about the pros and cons of tearing off vs. roofing over the existing structure.
For metal roofs, the procedure involves loosening fasteners with a pry bar or drill, removing the ridge cap, and detaching each panel methodically. These panels will be carefully removed and lowered to the ground, repeating until the entire surface is cleared.
Local Roofing Experts Will Come Inspect Your Homes Roof Today, Call 352-268-1990
Oh, did I mention its FREE?
5. Roof Inspection
Post-demolition, your contractor conducts a thorough inspection of the sheathing — the structural base for your roofing material. This step is crucial to identify any damp spots or areas needing repair before proceeding. Ensuring the sheathing is sound and secure is paramount for the longevity of your new roof. Learn more about the importance of roof evaluation before installation.
By understanding these steps and material choices, you’re better prepared to navigate the roof replacement process and make informed decisions alongside your contractor.
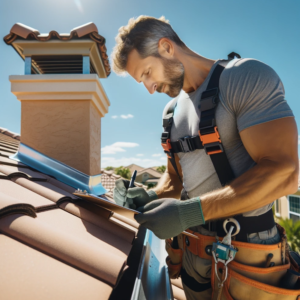
After removing the old roofing, the existing flashing is meticulously inspected and replaced if necessary, using high-grade materials to enhance the roof’s resilience against water ingress, ensuring all joints, valleys, vents, and the chimney are securely protected.
6. Flashing Inspection and Replacement
Post-stripping the old roofing, the existing flashing is thoroughly examined. Flashing, typically made from aluminum or galvanized steel, is a crucial component for preventing water from entering the joints of your roof. It encompasses the drip edge, and any flashing found at the roof’s valleys, vents, and chimney. Should a replacement be necessary, high-grade flashing will be installed and sealed to fortify the roof against water ingress. Learn how to deal with Hail damage and get your storm damage roof repaired.
When you remove old roofing, always conduct a detailed inspection of the existing flashing, which is vital for water protection at your roof’s joints.
7. Drip Edge Installation
Installing the drip edge is a two-phase process during roof installation. At the lower roof part, it precedes the underlayment, and on the roof’s sides, it follows. The contractor begins by affixing the metal drip edge along the roof’s bottom, atop the ice and water barrier, securing it flatly against the roof’s surface. Learn more about the drip edge installation process.
The underlayment is crucial for a roof’s longevity, acting as a guardian against water and moisture, safeguarding the underlying sheathing and framing.
8. Laying the Underlayment
The roofing underlayment is integral to your roof’s health, designed to channel water away, protecting the sheathing and framing beneath from moisture and rot. The process starts with laying an ice and water barrier, followed by the underlayment, each layer meticulously nailed down and overlapped for maximum efficacy. Detailed information on underlayment installation and its importance can be found on our resource page.
In places like Florida, consider materials that can withstand high humidity and heat, such as metal or tile roofs.
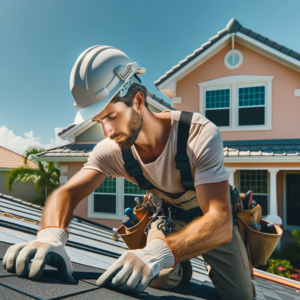
9. New Roof Installation
For shingle roofs, the installation involves carefully placing starter shingles, staggering each row, and properly nailing each shingle under the tar strip to prevent water leakage. For metal roofs, the process includes strategically screwing up the vertical edges and working ridge by ridge to ensure a flat, water-resistant finish. More on shingle and metal roof installation can be discovered through our comprehensive guides.
Always verify that your roofing contractor has a detailed cleanup and inspection plan included in your service agreement.
10. Post-Installation Cleanup and Inspection
Upon completion, the contractor undertakes a thorough cleanup, ensuring no debris is left behind. An exhaustive roof inspection follows to confirm the installation’s integrity and the quality of materials used. Our article on roofing project cleanup outlines the standards and practices involved.
Make sure to evaluate each contractor’s credentials, experience, and customer feedback.
Choosing a Roof Installation Contractor
Selecting the right contractor for your new roof installation is a decision that requires careful consideration. Assessing qualifications, reviewing testimonials, comparing quotes, and scheduling face-to-face meetings are all part of the selection process. For assistance, turn to our curated list of vetted local contractors ready to bring your roofing project to fruition. Start your journey to a new roof by exploring our resources today.
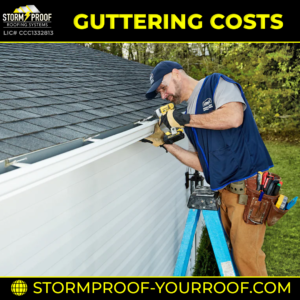
Post-roof installation, ensure your contractor completes ridge vents for attic ventilation, installs flashings to seal water entry points, attaches gutters for water runoff, and applies sealant to prevent leaks.
Finalizing Roof Features
After the main roof is installed, your contractor will focus on finalizing additional features:
Ridge Vents: These are installed at the peak of your roof to allow hot air to escape from the attic, promoting a well-ventilated and more energy-efficient home.
Flashing Installation: This includes installing flashing around the chimney, skylights, and vent pipes, ensuring every potential entry point for water is securely sealed.
Gutter Installation: If necessary, new gutters may be installed or existing ones re-attached, ensuring proper water runoff and protecting the foundation of your home.
Sealant Application: A final application of sealant is applied to all the flashing and vents to ensure there are no leaks.
A good roofing contractor isn’t just about installation; they are your guide through the entire lifespan of your roof.
Quality Assurance and Warranties
A reputable roofing contractor will provide a thorough walk-through of your new roof, ensuring that all components meet quality standards. They should also explain the roofing warranties that come with your new roof, including what is covered and for how long. This is the time to ask questions and clarify any concerns you may have about maintenance and the longevity of your roofing materials.
To understand more about roofing warranties and what they cover, visit our roofing warranties explained section.
The best roofing contractors don’t just walk away after the installation—they offer comprehensive after-service care
After-Service Care
The best contractors offer after-service care. This includes a follow-up visit to ensure the roof is performing as expected and to address any concerns you might have once you’ve had a chance to experience your new roof in different weather conditions.
For a new roof, longevity is key. To extend its lifespan, craft a robust maintenance strategy.
Long-Term Maintenance Plan
To prolong the life of your new roof, it’s advisable to establish a maintenance plan. Regular inspections, cleaning, and preventative repairs can help avoid future issues and save money in the long run. Your contractor can provide a maintenance schedule tailored to your specific roofing materials and climate.
Discover how to maintain your new roof with our comprehensive roof maintenance tips.
By following these additional steps, you can ensure that your new roof will be a durable and long-lasting investment. Remember, a well-installed and properly maintained roof not only protects your home from the elements but also enhances its overall value. Visit our roof installation services page for more information on how we can assist you with your roofing project from start to finish.