The Artful Dance of Roof Flashing: Harnessing its Mighty Magic for Unyielding Storm Protection
Introduction to Roof Flashing and Storm Protection
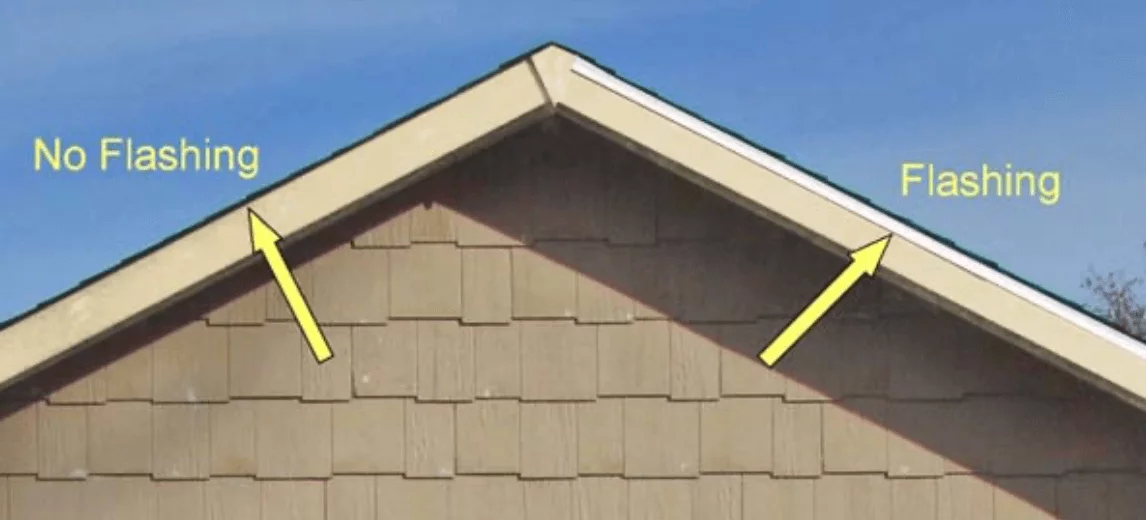
Definition of roof flashing
When it comes to protecting our homes from the wrath of storms, one component that often goes unnoticed is roof flashing. So, what exactly is roof flashing?
In simple terms, it refers to the material installed around various openings on a roof, such as chimneys, vents, skylights, and dormers. Its primary purpose is to create a watertight seal and prevent any moisture from infiltrating into your home.
Roof flashing is typically made of durable materials like aluminum, galvanized steel, or even synthetic rubber. These materials are chosen for their resistance to rust and corrosion while also providing flexibility for proper installation.
The flashing is strategically placed in areas where water has the potential to seep through gaps in the roofing material or around protrusions. It serves as a protective barrier against rainwater and melting snow during intense storms.
Importance of proper roof flashing for storm protection
Proper roof flashing plays an indispensable role in safeguarding your home during storms. Without adequate protection provided by well-installed flashing, your roofing system becomes vulnerable to leaks and water damage. Imagine heavy rain pouring down on your house while you sit inside cozily—thanks to well-functioning flashings that keep the water at bay.
By creating a tight seal around openings on your rooftop, roof flashings act as a first line of defense against rainfall penetration. During severe weather events like hurricanes or thunderstorms with torrential downpours, strong winds can easily push water into any gap or crevice it finds.
However, if you’ve invested in properly installed roof flashings made with quality materials suitable for your climate conditions, you significantly reduce the risk of water intrusion. Moreover, proper roof flashing doesn’t just protect against leakage; it also enhances the overall structural integrity of your home.
By preventing water from seeping into the building envelope, it safeguards against potential damage to walls, ceilings, insulation, and even electrical systems. Ultimately, investing in proper roof flashing provides you with peace of mind, knowing that your home is well-protected, no matter what Mother Nature throws at it.
The Role of Roof Flashing in Storms
How roof flashing prevents water intrusion during storms
Roof flashing is like the unsung hero of your home’s defense against Mother Nature’s wrath. It acts as a protective barrier, preventing water from seeping through vulnerable areas where your roof meets other structures, such as chimneys, vents, skylights, and dormers.
By creating a watertight seal around these critical junctions, roof flashing directs rainwater away from the vulnerable areas and safely into the gutters or downspouts. Imagine you’re caught in a fierce storm—rain pouring down like a waterfall, wind howling like an uncontrollable beast.
Without proper roof flashing, this storm could wreak havoc on your home’s interior. Water could easily find its way through gaps or cracks around these vulnerable spots and start dripping onto your ceilings or running down your walls.
Over time, this can lead to costly structural damage and even mold growth. So you see, roof flashing acts as the first line of defense against water intrusion during storms and helps you maintain a cozy, dry sanctuary within your home.
Types of storms where roof flashing is crucial
While all storms pose some level of threat to your home’s integrity, there are certain types that demand extra attention when it comes to protecting against water infiltration. One such example is torrential rainstorms that come with heavy downpours that seem never-ending. The relentless force of rainfall can put immense pressure on your roofing system and expose any weaknesses in the flashing.
This makes it especially crucial to have properly installed and well-maintained flashings in place to divert water away effectively. Another type of storm where roof flashing becomes paramount in protection is hurricanes or tropical storms.
These tempests bring not only heavy rain but also strong winds that can exert tremendous pressure on your entire roofing system. Without robust flashing, these winds can easily lift or displace loose shingles, creating gaps for water to penetrate.
Additionally, hurricanes often bring flying debris that can damage your roof and compromise the integrity of your flashing. By ensuring your roof flashing is up to par before hurricane season hits, you’re providing an extra layer of defense against the elements.
Remember, it’s not just the severity of storms but also their frequency that matters. If you live in an area prone to frequent rainstorms or have a climate with unpredictable weather patterns, it’s essential to prioritize the strength and quality of your roof flashing.
Taking proactive measures to install and maintain proper flashing will go a long way in safeguarding your home against the perils of stormy weather. Stay tuned for section three where we’ll delve into different types of roof flashing materials and their benefits in protecting against storms.
Exploring Different Types of Roof Flashing Materials
Traditional materials like galvanized steel and aluminum
When it comes to roof flashing, traditional materials like galvanized steel and aluminum have stood the test of time. Galvanized steel is a popular choice due to its exceptional strength and durability.
It is coated with a layer of zinc, which protects the metal from rust and corrosion. This makes it perfect for areas prone to heavy rainfall or coastal regions with high salt content in the air.
On the other hand, aluminum flashing offers similar benefits but with the added advantage of being lightweight and easy to work with. It is particularly suitable for quick installation needs.
Both galvanized steel and aluminum flashing are known for their affordability, making them widely accessible options for homeowners on a budget. Additionally, these materials can be shaped and bent on-site to fit any roof profile or configuration, ensuring a seamless installation that effectively prevents water penetration during storms.
Modern alternatives such as synthetic rubber and thermoplastic
As technology progresses, so does roofing materials innovation. Enter synthetic rubber and thermoplastic flashing—modern alternatives that offer enhanced performance and weather resistance.
Synthetic rubber, often made from ethylene propylene diene monomer (EPDM), boasts excellent flexibility even in extreme temperatures. This flexibility allows it to conform precisely to irregular shapes on your roof’s surface, ensuring tight seals that keep out rainwater during storms.
Thermoplastic flashing materials such as PVC (polyvinyl chloride) or TPO (thermoplastic olefin) have gained popularity due to their exceptional resistance against UV rays, punctures, and chemical damage. These materials are highly durable yet lightweight enough not to impose excessive stress on your roof structure.
One noteworthy advantage of modern alternatives is their ease of installation thanks to advancements in adhesive technology. Many synthetic rubber or thermoplastic flashings are self-adhering, eliminating the need for specialized tools or excessive manual labor.
Moreover, these materials offer long-lasting performance, reducing the frequency of maintenance and replacement. While traditional materials like galvanized steel and aluminum have been trusted for decades, modern alternatives such as synthetic rubber and thermoplastic have brought a new level of performance to roof flashing.
Whether you opt for the strength and affordability of galvanized steel or the innovative features that synthetic rubber or thermoplastic offer, it is essential to choose a flashing material that matches your climate conditions and desired level of durability. Ultimately, investing in proper roof flashing will provide your home with enhanced storm protection for years to come.
The Science Behind Proper Installation Techniques for Roof Flashing
Step-by-step Guide on Installing Roof Flashing Correctly
Subtitle: A Blueprint for Flawless Protection When it comes to safeguarding your roof against the wrath of storms, proper installation of roof flashing is the key. But let’s not underestimate the scientific precision that goes into this seemingly mundane task.
Follow this step-by-step guide to ensure your roof flashing is flawlessly installed and ready to fend off even the fiercest storms. 1. Begin with a Solid Foundation:
Before you even think about installing roof flashing, make sure your roof deck is in top shape. Repair any damaged or rotten sections, ensuring a sturdy foundation for your flashing.
Remember, a strong base sets the stage for optimal protection. 2. Choose the Right Materials:
Selecting suitable materials is crucial in creating an effective barrier against storm-induced water intrusion. Opt for high-quality materials like galvanized steel or aluminum that offer durability and resistance to corrosion.
Ensure compatibility between different materials used in conjunction with flashing, such as sealants and adhesives. 3. Determine Flashing Placement:
Identify vulnerable areas on your roof where water might find its way through gaps or joints. Common locations include chimneys, skylights, valleys, and intersections between walls and roofs.
Mark these spots as potential flashing points before proceeding further. 4. Measure Twice, Cut Once:
Precision is paramount when cutting and shaping your flashing materials according to predetermined measurements obtained during pre-installation inspections. Take extra care while handling sharp tools to prevent accidents or damage to existing structures.
5. Securely Attach Flashing: Using appropriate fasteners like roofing nails or screws (depending on the material), secure each piece of flashing firmly in place over vulnerable areas previously identified.
Ensure a tight fit that prevents water from seeping underneath. 6. Seal All Seams Effectively:
To reinforce the water-resistant properties of your flashing, apply an industry-standard sealant to all seams and joints. This additional layer acts as a secondary defense against storm-driven moisture, bolstering your roof’s resilience.
Common Mistakes to Avoid During Installation
Subtitle: Steer Clear of These Pitfalls Even with a thorough guide at hand, it’s worth highlighting some common mistakes that often occur during roof flashing installation. By familiarizing yourself with these pitfalls and avoiding them diligently, you can save yourself from potential headaches down the road.
1. Insufficient Overlap: One of the most prevalent errors is failing to provide enough overlap between different pieces of flashing.
Insufficient overlap compromises the integrity of your flashing system, leaving gaps susceptible to water penetration. Always follow manufacturer guidelines for recommended overlaps to maximize protection.
2. Improper Fastening Techniques: Using incorrect or insufficient fasteners can compromise the stability and efficacy of your flashing system.
Make sure you use fasteners suitable for your chosen materials and adhere strictly to recommended spacing guidelines. 3. Neglecting Proper Sealing Practices:
Sealing any gaps or joints is a critical step in preventing leaks, yet it’s often overlooked or done hastily. Take your time when applying sealants, ensuring complete coverage and proper adhesion between flashing components.
Avoiding these common mistakes during installation will save you from potential damage caused by subpar workmanship. Remember, investing time and effort into meticulous installation now will pay dividends in sturdy storm protection over time.
Enhancing Storm Resistance with Advanced Roof Flashing Systems
Introduction to self-adhered membranes for enhanced protection
When it comes to protecting your home from storm damage, traditional roof flashing materials like galvanized steel and aluminum have long been the go-to choices. However, advancements in technology have brought about a new player in the game – self-adhered membranes.
These innovative roofing materials are designed to provide superior protection against harsh weather conditions, including heavy rains and strong winds. Self-adhered membranes are made from a combination of synthetic rubber and asphalt, creating a flexible and durable barrier that can withstand even the toughest storms.
Unlike traditional flashing systems that require nails or screws for installation, these membranes come with a self-adhesive backing that allows for easy application without compromising their effectiveness. This means fewer opportunities for water to seep through gaps or loose fasteners during a storm.
Benefits of using advanced roof flashing systems
Using advanced roof flashing systems, such as self-adhered membranes, offers several notable benefits when it comes to storm resistance. Firstly, these high-tech flashings provide an exceptional seal against water intrusion.
The self-adhesive nature of the membranes ensures a tight bond between the flashing and the roofing material, leaving no room for water to penetrate. Additionally, advanced roof flashing systems offer enhanced durability compared to traditional options.
Their synthetic rubber composition makes them highly resistant to cracking or deterioration caused by extreme weather conditions like heat or cold. This means you can rely on these flashings to maintain their effectiveness over an extended period without requiring frequent repairs or replacements.
Moreover, using advanced roof flashing systems can contribute to energy efficiency. Self-adhered membranes often come with reflective surfaces that help reduce heat absorption from the sun’s rays.
By minimizing heat transfer into your home during hot summer months, these flashings can lower cooling costs and improve overall energy efficiency. Advanced roof flashing systems, such as self-adhered membranes, bring a range of benefits to storm protection.
The introduction of these innovative materials provides homeowners with a reliable and durable solution to safeguard their roofs from the damaging effects of storms. By ensuring a tight seal against water intrusion and offering enhanced durability, these flashings not only protect your home from leaks but also contribute to energy efficiency.
Maintaining and Inspecting Roof Flashing for Long-Term Durability
Section A: Importance of Regular Maintenance to Prevent Leaks and Damage
Subtitle: Preserving the Shield Against Nature’s Wrath When it comes to protecting your home from the unpredictable forces of nature, roof flashing plays a vital role.
However, simply installing proper roof flashing is not enough; regular maintenance is key to ensuring its long-term durability. By neglecting this essential aspect, you risk compromising the integrity of your roofing system, leaving it vulnerable to leaks and damage.
Regular maintenance involves a combination of visual inspections, cleaning, and proactive repairs. It’s crucial to keep an eye out for signs of wear and tear, such as cracks or gaps in the flashing material.
Additionally, be attentive to any potential water stains or moisture buildup on your ceiling or walls – these are often early indicators of flashing issues. To prevent leaks caused by damaged or deteriorating roof flashing, it’s important to address problems as soon as they arise.
Promptly repairing any cracks or gaps will ensure that water doesn’t find its way into your home during a storm. By investing time in regular maintenance and repairs, you can extend the lifespan of your roof flashing and enhance its ability to protect against nature’s relentless onslaught.
Section B: Tips for Inspecting Roof Flashing and Addressing Issues Proactively
Subtitle: Eyes on the Roofscape – A Proactive Approach Inspecting your roof flashing doesn’t have to be an arduous task if you know what signs to look for.
Here are some practical tips for inspecting roof flashing like a seasoned pro: 1. Visual Examination: Begin by visually inspecting all areas where roof flashing is present – around chimneys, vents, skylights, and valleys.
Look out for any visible damage like rust spots or loose sections that may have shifted due to harsh weather conditions. Pay attention to the seals around the flashing as well, ensuring they’re intact and free from cracks.
2. Check for Water Stains: Inside your home, keep an eye out for water stains on ceilings and walls, particularly near areas where roof flashing is installed. These stains often indicate that water is making its way into your home due to compromised flashing.
3. Debris Removal: Regularly clear away debris like leaves, twigs, and dirt that can accumulate around roof flashing. These obstructions can lead to water pooling and eventually cause damage to the flashing material.
4. Professional Inspection: While you can conduct routine inspections yourself, it’s wise to schedule professional inspections at least once a year. A trained eye can spot potential issues that might go unnoticed by an untrained homeowner.
Remember, addressing roof flashing issues proactively will ultimately save you from costly repairs down the line. By adopting a proactive approach and regularly inspecting your roof flashing, you’ll be well-equipped to protect your home against stormy weather and ensure its long-term durability against nature’s formidable forces.
Uncovering Lesser-Known Facts About Roof Flashing
Historical Significance of Roof Flashing in Architecture
Roof flashing may seem like a modern invention, designed to protect our homes from the ravages of nature, but its history actually dates back centuries. In fact, roof flashing has been utilized in architecture for as long as humans have been constructing buildings.
Ancient civilizations such as the Romans and Egyptians understood the importance of diverting water away from vulnerable areas of their structures. The Romans were particularly skilled at using lead for their roof flashing, a material they had mastered by the 1st century AD. Their advanced techniques allowed them to create intricate systems that not only prevented leaks but also added aesthetic value to their buildings.
They would carefully shape and mold the lead sheets to fit around corners and edges, creating visually appealing designs that complemented the overall architectural style. Over time, different materials and techniques have been employed in roof flashing.
From traditional metals like copper and zinc to more contemporary options like synthetic rubber and thermoplastic, advancements have made it possible to achieve even greater protection against storms and natural disasters. Despite these innovations, we owe a debt of gratitude to our ancestors who laid the foundation for roof flashing’s historical significance in architecture.
Conclusion
As we delve into the world of roof flashing, an intriguing tapestry emerges—a combination of ancient wisdom and modern engineering marvels. From its humble origins in ancient civilizations to its evolution into sophisticated systems capable of withstanding fierce storms, roof flashing has proven time and again its vital role in protecting our homes. So next time you look up at your roof, take a moment to appreciate this unsung hero silently guarding your home against rain, wind, and other elements that seek entry.
It may not be glamorous or flashy (pun intended), but proper roof flashing is undeniably essential for storm protection. By understanding its historical significance and embracing the advancements of the present, we can ensure our homes remain safe and secure for generations to come.