
A Step-by-Step Guide to Installing TAMKO 10" Starter Shingles
Whether you’re a homeowner or a professional roofer, installing the first course of shingles is an essential part of any roofing project. TAMKO® 10-Inch Starter course shingles not only make this process more efficient but also provide added durability and visual appeal. In this comprehensive guide, we’ll walk you through each step to ensure a successful and long-lasting installation.
Understanding the Benefits of TAMKO 10-Inch Starter Course Shingles
These starter shingles are crafted from a fiberglass mat coated on both sides with coating-grade asphalt, and surfaced with ceramic granules for an attractive appearance. Each bundle contains 30 starter shingles, complete with a factory sealant strip that streamlines the application process.

Advantages of TAMKO Starter Shingles
- Factory-cut for easy installation
- Eliminates field-cutting 3-tab and roll roofing materials
- Comes with a factory sealant strip to replace the need for plastic cement
- Designed for a wide range of TAMKO shingles
Note: TAMKO 10-Inch Starter course shingles are not compatible with TAMKO Elite Glass-Seal shingles or any 36″ length shingles, as this can lead to improper joint alignment for the first course of shingles.
Preparing for Installation
Before installing the TAMKO 10-Inch Starter course shingles, ensure that your roofing deck is clean, dry, and free of any debris. You’ll also want to gather the necessary tools and materials:
Tools and Materials

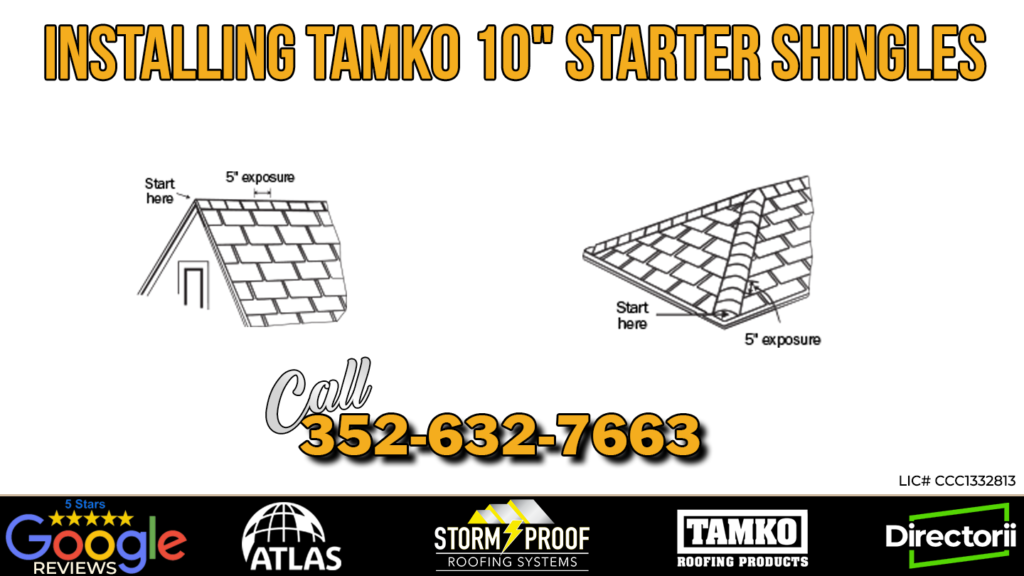
Installing the TAMKO 10-Inch Starter Shingles
With your tools and materials ready, follow the steps below to install the TAMKO Starter course shingles:
Position the underlayment: Place eave flashing or asphalt-saturated felt on the roofing deck. The underlayment should extend from the eave edge up the roof deck to the required minimum height, per local building codes.
Install drip edge flashing (if applicable): If using drip edge flashing, install it along the eaves and rakes according to the manufacturer’s instructions.
Align the first starter shingle: Position the first starter shingle with a 1/2 shingle removed to ensure proper alignment with the first shingle course. The starter shingle should overhang eaves and rakes by 1/4″ to 3/4″ if no drip edge flashing is present. If drip edge flashing is in place, install shingles even with the drip edge or overhang the drip edge up to 3″.
Fasten the starter shingle: Secure the first starter shingle with roofing nails located 1-1/2″ to 3″ from the eave edge. Ensure that the self-sealing adhesive is positioned along the eaves or rake edge.
Install the next full starter shingle: Position the next full starter shingle adjacent to the first one, aligning it with the edge of the first shingle.
Fasten and continue: Secure the full starter shingle with roofing nails, as described in step 4. Continue installing the starter shingles along the eave edge, maintaining proper alignment and maintaining a consistent overhang.
Repeat for rake edges (if applicable): If your roof has rake edges, follow the same process to install TAMKO 10-Inch Starter course shingles along the rake edge, ensuring proper alignment and overhang.
Begin installing the first course of shingles: Once the starter course is in place, begin installing the first course of shingles, following the manufacturer’s instructions for proper alignment, exposure, and fastening.
Offset the first shingle course: To ensure a proper staggered pattern, the first shingle in the main course should be offset from the starter course. This will help prevent water infiltration and create a more visually appealing pattern.
Continue installing shingles: Proceed with the installation of the remaining shingles on your roof, following the manufacturer’s guidelines and maintaining the proper alignment and pattern.
Inspect your work: Once the installation is complete, thoroughly inspect your work to ensure proper alignment, fastening, and overall quality. Address any issues or inconsistencies before moving on to the next stage of your roofing project.
Wrapping Up Your Roofing Project
By choosing TAMKO 10-Inch Starter course shingles for your roofing project, you’ve made a smart decision that streamlines the installation process and sets the stage for a successful and visually appealing result. Remember to follow the recommended installation instructions, and avoid using these starter shingles with certain other types of shingles that may cause alignment issues.
With proper installation, TAMKO Starter course shingles can provide a durable, long-lasting, and attractive foundation for your new roof. So go ahead, admire your handiwork, and enjoy the peace of mind that comes from a job well done.